Wednesday, June 11, 2008

<Image Source="images/myimage.jpg" /> in WPF

I had a very annoying problem when I did a simple WPF program. I just wanted to test something and I wanted my program to display an image. This is what I did:

1. Create a new WPF application in Visual Studio.

2. Create a folder in my project with the name "images". Add an image to this folder on disk.

3. Right click the images-folder and select add existing item. The image is added and it is set to "Resource".

4. In Window1.xaml set the following code:

<Window x:Class="TestProject.Window1"
    xmlns="http://schemas.microsoft.com/winfx/2006/xaml/presentation"
    xmlns:x="http://schemas.microsoft.com/winfx/2006/xaml"
    xmlns:local="clr-namespace:TestProject"
    Title="Test" Height="500" Width="650">

    <Grid Background="Black">
        <Image Source="images/1.jpg" />        
    </Grid>

</Window>

5. When running this code it works ok, but when I want to see it in the Visual Studio Designer I get an exception saying:

Error    1    The file /images/1.jpg is not part of the project or its 'Build Action' property is not set to 'Resource'.   

Solution: Rename the image to something like img1.jpg. I do not know why this happen but it works if you rename the image-file. You could rename it to 2.jpg and it will work. Anyone?

Use Live ID to login to your Silverlight application

In this post I will give you a step by step walkthrough of how to use Windows Live ID Web Authentication for logging in to a Silverlight app.

My first attempt was to create a login directly in Silverlight. I looked at Windows Live ID Client SDK which is the WinForm version of the Live ID SDK, but it seems that this SDK can not be used with Silverlight apps. The next approach was to use ASP.NET authentication and encapsulate the Silverlight authentication in ASP.NET sites. This is exactly what I will describe below. The example is pretty much independent of Silverlight version, but it uses Silverlight 2 (Silverlight 2 Beta 2).


1. Register your application with Windows Live ID

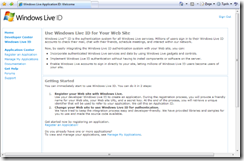
First of all we need to register our application with the Windows Live ID. To be able to use the authentication functionality of Live ID the application must be registered. Go to https://msm.live.com/app/default.aspx and select "Register an Application".

image

Note: If you want to use localhost in development and testing you must register this as an application. If you then have another server for publishing the application, you also need to register that one as another application. In this example I will use localhost.
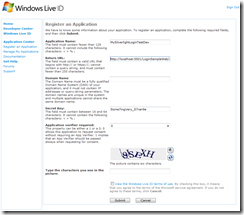
image

E.g.:
Application Name: MySilverlightLoginTestDev
Return URL: http://localhost:5501/LoginSampleWeb/authresponse.aspx
Domain Name: [Leave this empty for localhost registration]
Secret Key: Some7ingVery_1ong_AnD_S7ran9e
Application verifier required: 0

Remember the port that is registered as return URL, this will later be set in Visual Studio. When the information has been submitted you find information about it under "Manage My Application". You also find an Application ID here that you need later in Visual Studio.

Now you have registered an application with Live ID and it is time for code and Visual Studio.


2. Sample Project

<SourceCode>Download sample project here.</SourceCode>

First download, unzip and open the Visual Studio sample. You will see something like this in the Solution Explorer:

image

1. Open web.config, you find this block in the config file. Copy the information that you entered previously in the registration.

<appSettings>
   <add key="wll_appid" value="YourAppIdHere e.g. 00161AA1111111A"/>
   <add key="wll_secret" value="YourSecretKeyHere e.g. Some7ingVery_1ong_AnD_S7ran9e"/>
   <add key="wll_securityalgorithm" value="wsignin1.0"/>
   <add key="loginpage" value="Default.aspx"/>
   <add key="loggedinpage" value="LoginSampleTestPage.aspx"/>
   <add key="logincookie" value="webauthtoken"/>
</appSettings>

2. Now set the right port number. Select the web project in Solution Explorer (LoginSampleWeb) and then select properties.

image image

In the properties view, set Use dynamic ports to "False" and then set the port number to the same as you entered after localhost in the registration (localhost:5501).

3. Run the example.

image  image

3. How does it work - Overview

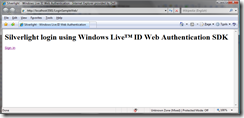
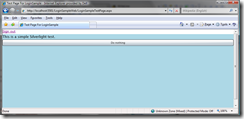
When you start the sample project Default.aspx will open. This is a very simple page that only displays some text and a "Sign in" link.

<body>
    <h1>Silverlight login using Windows Live&trade; ID Web Authentication SDK</h1>   

    <iframe
       id="WebAuthControl"
       name="WebAuthControl"
       src="http://login.live.com/controls/WebAuth.htm?appid=<%=_applicationId%>&style=font-size%3A+10pt%3B+font-family%3A+verdana%3B+background%3A+white%3B"
       width="80px"
       height="20px"
       marginwidth="0"
       marginheight="0"
       align="middle"
       frameborder="0"
       scrolling="no">
   </iframe>   
</body>

When the user clicks the link he/she will be redirected to a Live login page. If the login is successful the Live ID login page will return to the page that was specified in the registration, e.g. authresponse.aspx. In authresponse.aspx a cookie will be set with some settings to determine whether a user is logged in or not. This will also redirect the user to the right target page (LoginSampleTestPage.aspx). You can also get a specific token ("stoken") for the logged in user that you can use to identify your user and connect to user specific settings.

In LoginSampleTestPage.aspx we check that the user really is logged in. If he/she is not, we redirect them to the login page. If they are logged in we continue to load the page which in this case contains a Silverlight control.

    private static WindowsLiveLogin _windowsLiveLogin = new WindowsLiveLogin(true);
    protected static string _applicationId = _windowsLiveLogin.AppId;

    protected void Page_Load(object sender, EventArgs e)
    {
        HttpRequest request = HttpContext.Current.Request;
        HttpCookie loginCookie = request.Cookies[_windowsLiveLogin.LoginCookie];

        if (loginCookie == null)
        {
            RedirectToLoginPage();
        }

        string token = loginCookie.Value;
        if (string.IsNullOrEmpty(token))
        {
            RedirectToLoginPage();
        }

        WindowsLiveLogin.User user = _windowsLiveLogin.ProcessToken(token);
        if (user == null)
        {
            RedirectToLoginPage();
        }
    }

4. Summary

This is in fact only a encapsulation of a login to Silverlight. We use ASP.NET and server authentication for the login procedure and then give access to the Silverlight application. It is very easy to implement and we let the Live services handle the user registration and so on. Someone also mentioned that Silverlight will get some authentication controls in future versions but I do not know if that is true or not?! If such a control will come, then we can do client side authentication directly in Silverlight.


This example uses a modified version of WindowsLiveLogin.cs. The original file can be downloaded from the Windows Live ID Authentication SDK. You also find documentation and useful links at that location.

Thursday, May 22, 2008

Best scrollbar ever!

Last week I installed an addon to Visual Studio that replaces the old, gray scrollbar. RockScroll gives you a preview of your current file an it really rocks! :)

http://www.hanselman.com/blog/IntroducingRockScroll.aspx

RockScroll

Wednesday, May 21, 2008

I miss some interfaces

I don't think I'm the only one that misses some interfaces in the .NET framework. A while ago I worked with a graphics framework written in .NET and I wanted to create a generic class that would handle different types of data items collection. The type would be byte, int, double, Decimal and so on. The class should then be able to perform some calculations.

Now, the problem with generic classes is that it is generic. You should be able to put in any type and the class will work. But, one thing you can do is set some constraint on your generic class and only allow types implementing a specific interface or only value type/reference type. You do this by setting:

public class MyClass<T> where T : IMyInteface

Now the problem in my situation was that I wanted do perform calculations using standard value types. Ok, I could set that the generic type must only be a value type, but that wouldn't solve any of my problems. The real problem is that there is no interface for addition, subtraction... This means that you can not use generic classes and calculation :/. I had to limit my data type to double (or copy the class and implement the same class for byte, int).

My question is, will we see an interface for mathematical operations in the .NET framework?

Bilden “http://www.multisensory.biz/catalog/images/small%20maths%20symbols.jpg” kan inte visas, då den innehåller fel.

Thursday, May 15, 2008

Use DirectX in WPF

Yesterday I wrote about hardware accelerated effects in WPF 2D. Today I saw this video (http://channel9.msdn.com/Showpost.aspx?postid=403854) that show us that DirectX can be used from WPF. There are some (a lot!) differences between DirectX and WPF 3D and you might reach some point where WPF 3D isn't enough, you need the power of DirectX. Instead of a huge rewrite of WPF to DirectX, you can now combine these two and that is just soooo cool! I love it!


image

9 different DirectX sample apps running on a cube each. Displayed in WPF 3D!

Wednesday, May 14, 2008

WPF Effect on the GPU

This is just so cool! Now with .NET 3.5 Sp1, visual effects running on the GPU can be created and applied to WPF-components. There will be a set of effects provided for you like shadow and blur, or you can create your own with HLSL. The hittesting will still work and if the target computer can't handle shader language 2.0 or higher, it will automatically switch to software rendering.

To apply an effect you only need to write:
<Button ... >
    <
Button.Effect>
        <
DropShadowEffect />
    </
Button.Effect>
   
Hello
</Button>

Read more about WPF and GPU Effect here (it is a very good series of post): http://blogs.msdn.com/greg_schechter/archive/2008/05/12/a-series-on-gpu-based-effects-for-wpf.aspx


Motion blur:

image

image

Friday, May 9, 2008

Dotway Seminar: Painless migration to Silverlight 2.0

This summer the next highly awaited version of Silverlight will be released. New functionality, new languages and new ways to interact with the web. We will explain the most interesting news and show, with concrete examples in Silverlight and ASP.NET, what is needed to reap the benefits of these features. We will also show how to handle the transition to Silverlight 2.0 in a straightforward and painless way.

  • The news in Silverlight 2.0
  • The integration with ASP.NET and other techniques
  • The advantages with using Silverlight compared to other web client frameworks
  • The painless transition to Silverlight 2.0
    • For the customer
    • For the developer


Speakers:
Carl Kenne
Lars Sjögreen

Time:
2008-05-14 (Wednesday)
Kl. 17.00 - 18.30

Location:
Kompetenscenter Stockholm, Vasagatan 8-10

More info and Registration:
The seminar will be presented in Swedish.
www.dotway.se

Price:
Free

Programming languages:
C#
JavaScript
HTML

Technologies:
.NET
WPF
AJAX
Silverlight

image

Thursday, April 24, 2008

ScrumMaster

Now I have become a certified ScrumMaster after a course by Jeff Sutherland. I really like scrum since it makes development fun and is a tool that helps the team communicate. I believe that scrum can make a difference for development teams but at the same time it is not a silver bullet that will write your code. Think of it as a very simple tool for you and your team that makes it fun to work and also will help you increase your development velocity. I am looking forward to work with scrum and would really like to build an expert team that will reach the hyper speed of development and deliver, deliver, deliver :).

Tuesday, March 4, 2008

WPF Cursors

If you want to see or test the different mouse cursors in WPF (Windows Presentation Foundation) I've created a simple sample project to do so. Note that it is very easy to set the cursor on a FrameworkElement, all you have to do is to set the Cursor property:

<Border Cursor="Hand">
    <Button Content="My Button" Cursor="Help" />
</Border>

Some default Vista cursors:

Download sample project here.

Friday, February 22, 2008

SkyDrive - Wow!

I didn't use Windows Live Spaces as source for my blog because I missed the ability to have more than one blog. But Live Spaces have other great things and it is evolving all the time. The latest thing it Live SkyDrive which is a web based storage space for files. You can have your private folders, share folders with a set of friend or you can have public folders. The storage area is 5 GB (!) and it is free. All you need is to register for Live Spaces (which is piece of cake if you have a Hotmail-account).

Read more in the SkyDrive blog: http://skydriveteam.spaces.live.com/blog/